Thursday, 25 September 2014

How to Install Skype in CentOS 6.3, RHEL 6.3, Fedora 19


This tutorial explains how to install Skype in CentOS, Redhat linux. CentOS and RHEL requires more dependencies during installation of Skype and its difficult to install all the dependencies step by step manually. So we need to setup a repo for Skype or we can install a repository which contains Skype and its dependencies.

Setup Skype Repository
First of all you will find out your system architecture
[root@amir /]# arch
X86_64     – 64 bit linux
i386     – 32 bit Linux
If you have 64 bit linux OS then use following repository
rpm -ivh http://li.nux.ro/download/nux/dextop/el6/x86_64/nux-dextop-release-0-2.el6.nux.noarch.rpm
or else if you have 32 bit linux OS, then use this
rpm -ivh http://li.nux.ro/download/nux/dextop/el6/i386/nux-dextop-release-0-2.el6.nux.noarch.rpm
I have 32 bit linux OS
[root@amir /]# rpm -ivh http://li.nux.ro/download/nux/dextop/el6/i386/nux-dextop-release-0-2.el6.nux.noarch.rpm
Sample output:
Retrieving http://li.nux.ro/download/nux/dextop/el6/i386/nux-dextop-release-0-2.el6.nux.noarch.rpm
warning: /var/tmp/rpm-tmp.hMmOjE: Header V4 RSA/SHA1 Signature, key ID 85c6cd8a: NOKEY
Preparing…                ################################## [100%]
1:nux-dextop-release     ################################ [100%]
Installed: nux-dextop-release-0-2.el6.nux.noarch.rpm
If you need to clean your repositories, then do it
[root@amir /]# yum clean all
Loaded plugins: fastestmirror
Cleaning repos: base extras nux-dextop updates
Cleaning up Everything
Cleaning up list of fastest mirrors
Now Install Skype
[root@amir /]# yum install skype
For more information
It will ask you to import key, type “y” and then enter
Sample output:
warning: rpmts_HdrFromFdno: Header V4 RSA/SHA1 Signature, key ID 85c6cd8a: NOKEY
Retrieving key from file:///etc/pki/rpm-gpg/RPM-GPG-KEY-nux.ro
Importing GPG key 0x85C6CD8A:
Userid : Nux.Ro (rpm builder) <rpm@li.nux.ro>
Package: nux-dextop-release-0-2.el6.nux.noarch (installed)
From   : /etc/pki/rpm-gpg/RPM-GPG-KEY-nux.ro
Is this ok [y/N]: y
Installed:
skype.i586 0:4.0.0.8-1.el6.nux
Dependency Installed:
alsa-lib.i686 0:1.0.22-3.el6
flac.i686 0:1.2.1-6.1.el6
fontconfig.i686 0:2.8.0-3.el6
freetype.i686 0:2.3.11-14.el6_3.1
libICE.i686 0:1.0.6-1.el6
libSM.i686 0:1.2.1-2.el6
libX11.i686 0:1.5.0-4.el6
libX11-common.noarch 0:1.5.0-4.el6
libXScrnSaver.i686 0:1.2.2-2.el6
libXau.i686 0:1.0.6-4.el6
libXext.i686 0:1.3.1-2.el6
libXi.i686 0:1.6.1-3.el6
libXrender.i686 0:0.9.7-2.el6
libXtst.i686 0:1.2.1-2.el6
libXv.i686 0:1.0.7-2.el6
libasyncns.i686 0:0.8-1.1.el6
libjpeg-turbo.i686 0:1.2.1-1.el6
libogg.i686 2:1.1.4-2.1.el6
libsndfile.i686 0:1.0.20-5.el6
libtiff.i686 0:3.9.4-9.el6_3
libvorbis.i686 1:1.2.3-4.el6_2.1
libxcb.i686 0:1.8.1-1.el6
pulseaudio-libs.i686 0:0.9.21-14.el6_3
Complete!
[root@amir /]# rpm -qa | grep -i skype
skype-4.0.0.8-1.el6.nux.i586
Now Skype ready to use after successfully installed in your linux OS.

How To scp, ssh and rsync without password


scp command is used to copy files from source host to destination host. But we always need to enter a password on each time while using scp command. rsync command is used to synchronize data between hosts. By default rsync command uses ssh as well. Normally scp and rsync commands are used to transfer or backup files between known hosts. During perform this task we get prompting password every time which is really create hurdle.
You want to copy between two hosts src_hosts and dest_host. src_host is the host where you will run the ssh, scp or rsync command.
On src_host, run this command as the user that runs scp/ssh/rsync
[root@src_host .ssh]# ssh-keygen
 Generating public/private rsa key pair.
 Enter file in which to save the key (/root/.ssh/id_rsa):
 Enter passphrase (empty for no passphrase):
 Enter same passphrase again:
 Your identification has been saved in /root/.ssh/id_rsa.
 Your public key has been saved in /root/.ssh/id_rsa.pub.
 The key fingerprint is:
 00:87:e0:c9:ce:95:96:35:79:8b:d8:b5:3f:18:b7:3b root@src_host.example.com
This will prompt for a passphrase. You will only press the enter key. It’ll then generate an identification (private key) and a public key. Remember that don’t share the private key with anyone. ssh-keygen command shows where it saved the public key. By default dest_host path is ~/.ssh/id_rsa.pub:
There are two ways to transfer public key (id_rsa.pub) file from src_host to dest_host on path ~/.ssh/authorized_keys.
[root@src_host .ssh]# cat ~/.ssh/id_rsa.pub | ssh root@dest_host.example.com ‘cat >> .ssh/authorized_keys’
or
[root@src_host .ssh]# ssh-copy-id -i ~/.ssh/id_rsa.pub dest_host.example.com
 21
root@dest_host.example.com’s password:
 Now try logging into the machine, with “ssh ‘dest_host.example.com'”, and check in:
.ssh/authorized_keys
to make sure we haven’t added extra keys that you weren’t expecting.
If .ssh/authorized_keys file does not exists on dest_host, then the above command will create it.
[root@dest_host .ssh]# ll
 -rw-r–r– 1 root root 1213 Mar 5 07:05 authorized_keys
 -rw——- 1 root root 1675 Jun 13 2013 id_rsa
 -rw-r–r– 1 root root 404 Jun 13 2013 id_rsa.pub
 -rw-r–r– 1 root root 5124 Jul 29 2013 known_hosts
 -rw-r–r– 1 root root 404 Jun 13 2013 local.pub
Note that by default ssh command does not allow root to login. We can allow root user to login by editing /etc/ssh/sshd_config and changing the option of PermitRootLogin from no to yes. After change in configuration file, we have to restart sshd to effect changes which we made.

Now we have done this, you can run ssh, scp and rsync on src_host connecting to dest_host and it won’t ask for the password. Note that this will still prompt for the password if you are running the commands on dest_host connecting to src_host. You can reverse (vice versa) the steps above (generate the public key on dest_host and copy it to src_host) and you have a two way setup ready. Enjoy!

Monday, 22 September 2014

How to Disable SELinux Temporarily or Permanently

By default, SELinux is enabled on some of Linux distibution, due to this we face some issues which we don’t want to see any more. It is recommended to know about SELinux, its configuration and how to implement on your environment. However, you have to disable SELinux temporarily or permanently until you understand about it.
Here, we will use different ways to disable SELinux.
In linux, files and process tag with specific labels that is used by the SELinux. Command ls -Z view those labels as follows.
[root@amir ~]# ls -Z /etc/
-rw-r–r–. root root system_u:object_r:etc_t:s0           file
drwxr-xr-x. root root system_u:object_r:etc_t:s0        file
drwxr-xr-x. root root system_u:object_r:etc_t:s0        file
drwxr-xr-x. root root system_u:object_r:system          file
drwxr-xr-x. root root system_u:object_r:bin_t:s0       file
-rw-r–r–. root root system_u:object_r:etc_t:s0           file
drwxr-xr-x. root root system_u:object_r:bin_t:s0       file

Disable SELinux Temporarily
You have to modify the /selinux/enforce file to disable SELinux temprarily. After reboot the machine, temporary made settings will be refreshed.
[root@amir ~]# cat /selinux/enforce
1
[root@amir ~]# echo 0 > /selinux/enforce
[root@amir ~]# cat /selinux/enforce
0
setenforce command is also used to disable SELinux. Setenforce commands are: Enforcing , Permissive, 1 (enable) or 0 (disable).
[root@amir ~]# setenforce 0
setenforce: SELinux is disabled

Disable SELinux Permanently
we will modify the /etc/selinux/config and change to SELINUX=disabled to disable SELinux permanently. After reboot the machine, settings will remain effective and permanent.
[root@amir ~]# cat /etc/selinux/config
# This file controls the state of SELinux on the system.
# SELINUX= can take one of these three values:
#     enforcing – SELinux security policy is enforced.
#     permissive – SELinux prints warnings instead of enforcing.
#     disabled – No SELinux policy is loaded.
SELINUX=disabled
# SELINUXTYPE= can take one of these two values:
#     targeted – Targeted processes are protected,
#     mls – Multi Level Security protection.
SELINUXTYPE=targeted
SETLOCALDEFS=0

Disable SELinux from the Grub Bootloader
If you are unable to find out the location of /etc/selinux/config file, you can disable SELinux to change parameter to the Grub Bootloader in the following steps.
[root@amir ~]# vim /boot/grub/grub.conf
default=0
timeout=5
splashimage=(hd0,0)/grub/splash.xpm.gz
hiddenmenu
title CentOS (2.6.32-358.18.1.el6.i686)
root (hd0,0)
kernel /vmlinuz-2.6.32-358.18.1.el6.i686 ro root=LABEL=/ rhgb quiet selinux=0
initrd /initramfs-2.6.32-358.18.1.el6.i686.img
title centos (2.6.32-71.el6.i686)
root (hd0,0)
kernel /vmlinuz-2.6.32-71.el6.i686 ro root=/ rhgb quiet selinux=0
initrd /initramfs-2.6.32-71.el6.i686.img

Disable Only a Specific Service in SELinux – HTTP/Apache
If you don’t want to disable the whole SELinux, it is possible with the HTTP/Apache service, you can change the httpd_disable_trans variable in the /etc/selinux/targeted/booleans file.
Change into 1 the httpd_disable_trans variable.
[root@amir ~]# grep httpd /etc/selinux/targeted/booleans
httpd_builtin_scripting=1
httpd_disable_trans=1
httpd_enable_cgi=1
httpd_enable_homedirs=1
httpd_ssi_exec=1
httpd_tty_comm=0
httpd_unified=1
We can set the value using setsebool command. After that restart the HTTP service to take effect.
[root@amir ~]# setsebool httpd_disable_trans 1
[root@amir ~]# service httpd restart


Install and configure Telnet Server in Linux

Telnet service is to provide a text-oriented communications and this service is used on internet/LAN using a virtual terminal connection. Telnet by default uses 23 port number. We will use telnet server installation and configurations on CentOS 6 / Red Hat family as this service is also applicable and works to fedora distribution environment.

IP Configuration ( My Server IP address is 172.16.41.82 )

Telnet Server Configuration

Open Terminal and login as root user.

Install Telnet server using yum.

[root@amir /]# yum install telnet*

Need to configure telnet server, go to the directory /etc/xinetd.d to change configuration.

Using vim editor to edit the telnet file.
[root@amir /]# vim telnet


Change option ‘disable = yes’ to ‘disable = no’.

# default: on
 # description: The telnet server serves telnet sessions; it uses \
 #       unencrypted username/password pairs for authentication.
 service telnet
 {
 flags           = REUSE
 socket_type     = stream
 wait            = no
 user            = root
 server          = /usr/sbin/in.telnetd
 log_on_failure  += USERID
 disable         = no
 }

Restart the service after change in the file and permanently save the changes by using chkconfig option.

[root@amir xinetd.d]# service xinetd restart

Stopping xinetd:              [  OK  ]
Starting xinetd:              [  OK  ]

[root@amir xinetd.d]# chkconfig xinetd on

Check out the firewall settings for further configuration. Enable the firewall settings and add telnet port 23 and Protocol is tcp.

Again restart the xinetd service after firewall settings.

[root@amir /]# service xinetd restart                                   


How to Change SSH Port Number


It is highly recommended to change ssh port number and it is a good security practice for an administrator. By default ssh port number is 22 and you can change with any non usable port numbers.

[root@amir~]# cat /etc/services

In the above command, services file display all the service names with associated default port numbers. If you are not using that port then you can select any port.
Open the sshd configuration using a vim editor.

#vim /etc/ssh/sshd_config

Change from Port 22 to Port 2221

After implementing your required changes, save and quit from the configuration file and restart the ssh service. Service restart as shown below:

[root@amir ~]# service sshd restart

[root@amir ~]# chkconfig sshd on

Now you will connect the server using custom ssh port number.

[root@amir ~]# ssh rumee@server.amir.com -p 2221

Thursday, 18 September 2014

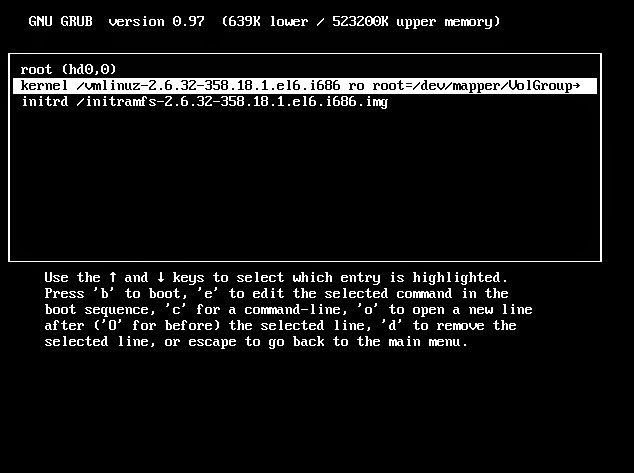
How to Recover Linux Root Password


If you forget your linux server or client machine root password. Don’t you worry about this! in this tutorial i will explain with steps how to recover linux root password and how you can reset it in simple way.
However, there are couple of methods to recover root password. So, lets go towards the easy and simple method I usually follow to recover my root user password in linux whenever I forget the password.

  • Save and close all your applications if you have opened already for safe data before reboot the machine.
  • Softly reboot your desktop client or server and wait for appearing a GRUB loader appearing.
  • When grub loader will be appeared, press “e” to edit into grub loader

  • Press arrow key and point to kernel line and then press “e” to edit into kernl

  • After that at the end of the kernel line and type single  or 1 or s after give single space as shown below in the screenshot. and press “Enter” now


  • Press “b” to boot after changes

  • Now you will get the root prompt without asking password

  • Reset the “root” password now.


  •                                                                            THE END

    Monday, 15 September 2014

    Routing (NAT)

                                                      Step By Step Configuration of NAT

    This tutorial shows how to set up network‐address‐translation (NAT) on a Linux system
    with iptables rules so that the system can act as a gateway and provide internet access to
    multiple hosts on a local network using a single public IP address. This is achieved by
    rewriting the source and/or destination addresses of IP packets as they pass through the
    NAT system.

    WAN = eth0 with public IP (120.50.4.162)
    LAN = eth1 with Private IP (192.168.1.100)


    ISP Line:

    IP Address: 120.50.4.160/30
    Usable IP (ISP): 120.50.4.161
    Usable IP (OFFICE): 120.50.4.162
    IP Address: 120.50.4.162
    Subnet mask: 255.255.255.252
    Gateway: 120.50.4.161
    Primary DNS: 203.112.194.243
    Secondary DNS: 203.112.194.15

    Step #1. Add 2 Network cards to the Linux System

    Step #2. Verify the Network cards, Wether they installed properly or not

    Step #3. Configure eth0 for Internet with a Public (IP External network or Internet)

    Ethernet Card Configuration: (For Public IP address)
    [root@gateway ~]# vim /etc/sysconfig/network‐scripts/ifcfg‐eth0
    DEVICE=eth0
    BOOTPROTO=none
    BROADCAST=120.50.4.163                         # Optional Entry
    HWADDR=00:21:27:c7:c0:0f
    IPADDR=120.50.4.162
    NETMASK=255.255.255.252                      # Provided by the ISP
    NETWORK=120.50.4.160                           # Optional
    ONBOOT=yes
    TYPE=Ethernet
    GATEWAY=120.50.4.161                            # Provided by the ISP

    Step #4. Configure eth1 for LAN with a Private IP (Internal private network)

    Ethernet Card Configuration: (For Private IP address)

    [root@gateway ~]# vim /etc/sysconfig/network‐scripts/ifcfg‐eth1
    DEVICE=eth1
    BOOTPROTO=none
    BROADCAST=192.168.1.255
    HWADDR=00:24:21:9a:6a:9a
    IPADDR=192.168.1.100                                 # Gateway of the LAN
    NETMASK=255.255.255.0                            # Specify based on your requirement
    NETWORK=192.168.1.0
    ONBOOT=yes
    TYPE=Ethernet

    Step #5. Host Configuration (Optional)

    [root@gateway ~]# cat /etc/hosts


    127.0.0.1           gateway              localhost.localdomain localhost

    Step #6. Gateway Configuration

    [root@gateway ~]# vim /etc/sysconfig/network
    NETWORKING=yes
    NETWORKING_IPV6=no
    HOSTNAME=gateway
    GATEWAY=120.50.4.161            # Internet Gateway, provided by the ISP

    Step #7. DNS Configuration

    [root@gateway ~]# vim /etc/resolv.conf
    nameserver 203.112.194.243                  # Primary DNS Server provided by the ISP
    nameserver 203.112.194.15                    # Secondary DNS Server provided by the ISP

    Step #8. NAT configuration with IP Tables

    # Delete and flush. Default table is "filter". Others like "nat" must be explicitly stated.

    [root@gateway ~]# cat /etc/sysconfig/iptables
    [root@gateway ~]# iptables –L
    [root@gateway ~]# service iptables stop
    [root@gateway ~]# iptables ‐F
    [root@gateway ~]# service iptables save
    [root@gateway ~]# iptables ‐t nat ‐A POSTROUTING ‐s 192.168.1.0/24 ‐j SNAT ‐‐tosource
    120.50.4.162
    [root@gateway ~]# service iptables save
    [root@gateway ~]# service iptables status
    [root@gateway ~]# service iptables restart
    [root@gateway ~]# cat /etc/sysconfig/iptables
    num        target    pro     opt        source            destination
    1             SNAT   all      ‐‐    192.168.1.0/24     0.0.0.0/0     to:120.50.4.162

    Step #8. Ip Forwarding Enable

    [root@gateway ~]# vim /etc/sysctl.conf
    net.ipv4.ip_forward = 1      [ Change “0” to “1” for ip forwarding enable]
    Step #9. Testing
    [root@gateway ~]# ping www.google.com
    [root@gateway ~]# ping 192.168.2.1
    [root@gateway ~]# route ‐n

    Destination            Gateway           Genmask         Flags Metric Ref Use           Iface
    120.50.4.160        0.0.0.0        255.255.255.252    U        0      0    0               eth0
    192.168.1.0          0.0.0.0        255.255.255.0        U        0      0    0               eth1
    169.254.0.0           0.0.0.0       255.255.0.0           U         0      0   0                eth1
    0.0.0.0                120.50.4.161   0.0.0.0                UG      0      0    0               eth0

    Client Configuration in Windows XP


    THE END

    Configuring RSYSLOG Server and RSYSLOG Client in RHEL 6

    Configuring RSYSLOG Server and RSYSLOG Client
    ==========================================
    একটি প্রোডাকশন নেটওয়ার্কে অসংখ্য নেটওয়ার্ক ডিভাইস যেমনঃ সুইচ, রাউটার, সার্ভার থাকতে পারে। এই সব ডিভাইসসমূহে প্রতিনিয়ত বিভিন্ন কনফিগারেশন পরিবর্তন করতে হয়, প্রতিদিন অসংখ্য বার ইন্টারফেস আপ-ডাউন হয়, পোর্টে ACL ভায়োলেশন হয়। এ রকম আরো অনেক কারণে প্রতিটি ডিভাইস প্রতিদিন শত শত Log জেনারেট করে। এই Log গুলো দেখা ও এ্যানালাইজ করা নেটওয়ার্ক সিকিউরিটির একটি অন্যতম গুরুত্বপূর্ণ বিষয়। ডিভাইসের Log দেখে বুঝা যায় ডিভাইসসমূহে অস্বাভাবিক কিছু ঘটছে কিনা। এই Log দেখেই পরবর্তী করণীয় ব্যবস্থা গ্রহন করা সহজ হয়। কিন্তু সমস্যা হলো যে, এই অসংখ্য ডিভাইসসমূহের Log আলাদা আলাদাভাবে দেখা অনেক কঠিন একটি কাজ। প্রতিটি ডিভাইসের টার্মিনাল ওপেন করে এদের Log মনিটর করা ভাল কোন সমাধানও নয়। এই ধরণের সমস্যার সমাধান হিসেবে ব্যবহার করা যেতে পারে RSYSLOG সার্ভার।
    .
    RSYSLOG এমন এক ধরণের সার্ভার যার কাছে নেটওয়ার্কের সকল RSYSLOG ক্লায়েন্ট ডিভাইসসমূহ এদের নিজস্ব Log পাঠায়। RSYSLOG সার্ভার প্রাপ্ত Log সমূহ নিজের টার্মিনালে দেখায় এবং ভবিষ্যতের রেকর্ড হিসেবে সংরক্ষনও করে থাকে। যখন Cisco ডিভাইসসমূহে Console/VTY পোর্টের মাধ্যমে কানেক্ট হয়ে কাজ করা হয় তখন ডিভাইসসমূহ বিভিন্ন সময়ে Log জেনারেট করে যা আমরা টার্মিনালে দেখতে পাই। এই Log সমূহ ডিভাইসের বাফারে জমা থাকে, এগুলোকে স্থায়ীভাবে সংরক্ষণ করা যায় না। কোন কারণে ডিভাইস রিবুট হলে Log গুলো হারিয়ে যায়। কিন্তু এক্ষেত্রে যদি আমরা RSYSLOG সার্ভার ব্যবহার করি তাহলে Log সমূহ সংরক্ষন করা সম্ভব এবং প্রয়োজনে পরবর্তীতে এ্যানালাইজ করা সম্ভব।
    .
    জেনারেট হওয়া Log সমূহের আটটি লেভেল রয়েছে। যেমনঃ
    i. Level 0: Emergencies
    ii. Level 1: Alerts
    iii. Level 2: Critical
    iv. Level 3: Errors 
    v. Level 4: Warning
    vi. Level 5: Notification
    vii. Level 6: Informational
    viii. Level 7: Debugging
    .
    এই লেভেলসমূহকে Severity Level বলা হয়ে থাকে। লেভেলের ভ্যালু যত কম হবে লেভেলের গুরুত্ব তত বেশি হবে।

    একটি Log Message এর তিনটি অংশ রয়েছে। 
    i. Timestamp:
    ii. Log Message Name and Severity Level
    iii. Message Text
    .
    Configuring RSYSLOG Server
    --------------------------------------
    RSYSLOG এর পূর্ণরূপ হলো Rocket-fast System for Log Processing । এই RSYSLOG সার্ভারের মাধ্যমে বিভিন্ন ধরণের ডিভাইস থেকে Log রিসিভ করা যায়।
    .
    প্রথমে একটি Red Hat 6 মেশিনে আমরা rsyslog প্যাকেজটি ইনস্টল করবো।
    [root@rsyslog ~]# yum install rsyslog* -y
    .
    প্যাকেজ ইন্সটল করা শেষ হলে আমরা /etc/rsyslog.conf ফাইলের মধ্যে কয়েকটি লাইনকে নিচের মতো করে এডিট করবো। লাইনগুলো ফাইলের মধ্যে লেখাই থাকে, শুধুমাত্র লাইনের শুরুতে # ক্যারেক্টারটি তুলে দিতে হবে।
    .
    [root@rsyslog ~]# vi /etc/rsyslog.conf
    # Provides UDP syslog reception
    $ModLoad imudp.so
    $UDPServerRun 514
    .
    # Provides TCP syslog reception
    $ModLoad imtcp.so 
    $InputTCPServerRun 514
    .
    অতঃপর আমরা /etc/sysconfig/rsyslog ফাইলটিতে নিচের মতো করে একটি লাইন লিখে ফাইলটি সেভ করবো।
    .
    [root@rsyslog ~]# vi /etc/sysconfig/rsyslog
    SYSLOGD_OPTIONS="-r -m 0"
    .
    ফাইলটি এডিট করা শেষ হলে আমরা rsyslog সার্ভিসটি স্টার্ট করবো
    .
    [root@rsyslog ~]# /etc/init.d/rsyslog start
    Starting system logger: [ OK ]
    [root@rsyslog ~]# chkconfig rsyslog on
    .
    যদি সার্ভারটিতে iptables সার্ভিস চলমান থাকে তাহলে সার্ভারটি যেন ক্লায়েন্ট ডিভাইসসমূহ থেকে Syslog Message গ্রহন করতে পারে সেজন্য আমরা TCP ও UDP 514 নম্বর পোর্টটিকে iptables এ Allow করবো এবং iptables সার্ভিসটি রিস্টার্ট দিব। 
    .
    [root@rsyslog ~]# iptables -I INPUT -p tcp --dport 514 -j ACCEPT
    [root@rsyslog ~]# iptables -I INPUT -p udp --dport 514 -j ACCEPT
    [root@rsyslog ~]# service iptables save
    iptables: Saving firewall rules to /etc/sysconfig/iptables:[ OK ]
    .
    সবশেষে যে ক্লায়েন্ট ডিভাইসসমূহ সার্ভারের কাছে Log পাঠাবে সেই ডিভাইসসমূহের আই.পি এবং হোষ্টনেমগুলো আমরা সার্ভার মেশিনের /etc/hosts ফাইলের মধ্যে এন্ট্রি দিব। ফাইলটির মধ্যে সার্ভারের নিজের আই.পি এবং হোষ্টনেমও থাকবে।
    .
    [root@rsyslog ~]# vi /etc/hosts
    192.168.10.5 rsyslog.example.com server
    192.168.10.11 router1.example.com router1
    192.168.10.12 router2.example.com router2
    192.168.10.13 www.example.com www
    .
    এই পর্যন্ত আমাদের RSYSLOG সার্ভার কনফিগার করার কাজ আপাতত শেষ। এখন আমরা দেখবো Cisco রাউটারকে কিভাবে RSYSLOG ক্লায়েন্ট হিসেবে কনফিগার করতে হয়।
    .
    প্রথমে আমরা রাউটারটির আই.পি এ্যাড্রেস, হোষ্টনেম, ডোমেইন ইত্যাদি কনফিগার করবো।
    .
    RT#configure terminal
    RT(config)‪#‎hostname‬ Router1
    Router1(config)‪#‎ip‬ domain-name example.com
    Router1(config)‪#‎interface‬ fastEthernet 0/0
    Router1(config-if)#ip address 192.168.10.11 255.255.255.0
    Router1(config-if)‪#‎no‬ shutdown
    Router1(config-if)‪#‎exit‬
    .
    একটি রাউটারে একাধিক ইন্টারফেস থাকতে পারে। এখন আমরা রাউটারটি এর কোন ইন্টারফেস দিয়ে সার্ভারের কাছে Log Message পাঠাবে তা নির্ধারণ করে দিবো।
    .
    Router1(config)‪#‎logging‬ source-interface fastEthernet 0/0
    .
    অতঃপর আমরা Log সমূহের Severity Level নির্ধারণ করবো। যেমনঃ আমরা যদি Severity Level হিসেবে 5 নির্ধারণ করি তাহলে রাউটার 0 থেকে 5 পর্যন্ত লেভেলের Log গুলো সার্ভারের কাছে পাঠাবে।
    .
    Router1(config)#logging trap 5
    .
    সবশেষে আমরা রাউটারের Logging অপশনটি এনাবল করবো।
    .
    Router1(config)#logging on
    .
    আমাদের RSYSLOG ক্লায়েন্ট কনফিগার করার কাজ শেষ। আমরা চাইলে ঠিক একইভাবে নেটওয়ার্কের আরো অনেক ডিভাইসকে RSYSLOG ক্লায়েন্ট হিসেবে কনফিগার করতে পারি।
    .
    আমরা যখন নেটওয়ার্কে একটি RSYSLOG সার্ভার ও একটি RSYSLOG ক্লায়েন্ট কনফিগার করবো তখন ক্লায়েন্ট ডিভাইসটি এর জেনারেট হওয়া Log গুলো সার্ভারের কাছে পাঠাবে। এখন আমরা RSYSLOG সার্ভারের টার্মিনাল থেকে ক্লায়েন্টের বিভিন্ন Log দেখতে পারবো। এই Log গুলো বাই ডিফল্ট RSYSLOG সার্ভারের /var/log/message ফাইলের মধ্যে জমা হয়। আমরা যদি পুরো ফাইলের কনটেন্ট দেখতে চাই তাহলে cat /var/log/message কমান্ডটি ব্যবহার করতে হবে। আর যদি ফাইলে শেষ দশটি লাইন দেখতে চাই তাহলে নিচের কমান্ডটি দিতে হবে।
    [root@syslog ~]# tail -f /var/log/messages
    .
    Sep 11 23:03:14 router1.example.com 14: *Mar 1 00:09:07.747:
    %SYS-5-CONFIG_I: Configured from console by console
    Sep 11 23:03:47 router1.example.com 15: *Mar 1 00:09:40.563:
    %LINK-5-CHANGED: Interface FastEthernet0/1, changed state to administratively down
    Sep 11 23:03:47 router1.example.com 16: *Mar 1 00:09:41.563: %LINEPROTO-5-UPDOWN: Line protocol on Interface FastEthernet0/1, changed state to down
    Sep 11 23:04:06 router1.example.com 17: *Mar 1 00:10:00.215:
    %SYS-5-CONFIG_I: Configured from console by console
    Sep 11 23:08:11 router1.example.com 9: *Mar 1 00:00:14.651:
    %SYS-6-LOGGINGHOST_STARTSTOP: Logging to host 192.168.10.5 started - CLI initiated
    Sep 11 23:08:12 router1.example.com 10: *Mar 1 00:00:14.719:
    %LINK-3-UPDOWN: Interface FastEthernet0/1, changed state to up
    Sep 11 23:08:13 router1.example.com 11: *Mar 1 00:00:15.367: %LINEPROTO-5-UPDOWN: Line protocol on Interface FastEthernet0/0, changed state to up
    Sep 11 23:08:13 router1.example.com 12: *Mar 1 00:00:15.723: %LINEPROTO-5-UPDOWN: Line protocol on Interface FastEthernet0/1, changed state to up
    .
    নেটওয়ার্কে যতগুলো RSYSLOG ক্লায়েন্ট ডিভাইস থাকবে ততগুলো ডিভাইসের Log ই FIFO এর ভিত্তিতে RSYSLOG সার্ভারের /var/log/message ফাইলের মধ্যে একের পর এক জমা হবে এবং আমরা তা দেখতে পারবো।


    Tuesday, 9 September 2014

    How to Show Date and Time in the Terminal

    In this tutorial we will talk about how to show date and time in the terminal. By default, the “prompt” or terminal displays the user name with which we are connected, the machine name and the path where it is located. As follows:

    So we see here that the prompt is “<username> @ <machinename>: <path>”.

    Note: When the user is in his home, the path is replaced by a tild (“~”).

    In this tutorial we will see how to change the appearance of the prompt to display the time, date, or other characters.

    Procedure

    We must first understand that the form display prompt is specific to each user defined in the environment variable “PS1″ initialized to start a session. We can check the value of the environment variable “PS1″ with the following command:

    [root@localhost usr]# echo $PS1

    Then we have the following result:

    We can therefore understand that:

    “\U” = user

    “@”: The symbol at sign

    “\H” = the name of the machine

    “\W”: the current path

    “$” Sign dollars

    Knowing this, we can freely change the appearance of our prompt. This requires that the time and date can be placed with the characters “\ t” for the time (“time”) and (“date”) “\ d” for the date. We can change the value of “PS1″ to add these characters with the following command:

    [root@localhost usr]# PS1=’\d\t\u@\h:\W$’

    We will immediately after a prompt like this:

    You can of course change the display order of elements at will.

    Make the Change Permanent

    Since we have only changed the environment variable, this change will only be temporary. Indeed, restart another session, the environment variable will be reset. For the change to be permanent for the user must add our line to change the PS1 variable in the initialization of bash file with the following command:

    [root@localhost usr]# echo “PS1=’\d\t\u@\h:\W$'” >> ~/.bashrc

    Then restart a session for verification. To make this change permanent same for all users, you must make the same change on the common bash initialization file for all users:

    [root@localhost usr]# echo “PS1=’\d\t\u@\h:\W$'” >> /etc/bash.bashrc

    Hope, this tutorial will informative for you. Enjoy!


    How to install clamAV on Centos 6

      Install EPEL repo: Before we can do proceed, you must ensure that you have the EPEL yum repository enabled. To do this, CentO...